
Pixel Art Techniques: Six different approaches
21/02/2024
Pixel art needs no introduction as it is a common and well loved medium for game assets. Over the years I have found myself using several different approaches to creating pixel art sprites and textures. Some of these approaches were easy to learn about, others I stumbled upon myself. I have written this summary to share the approaches/processes I follow for making pixel art, and hopefully it will make a nice addition to the body of pixel art knowledge on the internet.
To demonstrate each approach, I created example sprites based on a statue of Lady Justice from my city. She is supposed to hold a sword in her right hand, but it is missing from the original statue. I like the ironic symbolism of that, so I left out the sword, but then unintentionally forgot that she is supposed to be wearing a blindfold. So in some of the examples, you will see that I interpreted the blindfold as hair. As the examples were only created for this article they are quite unrefined.
Freehand (Outline first)
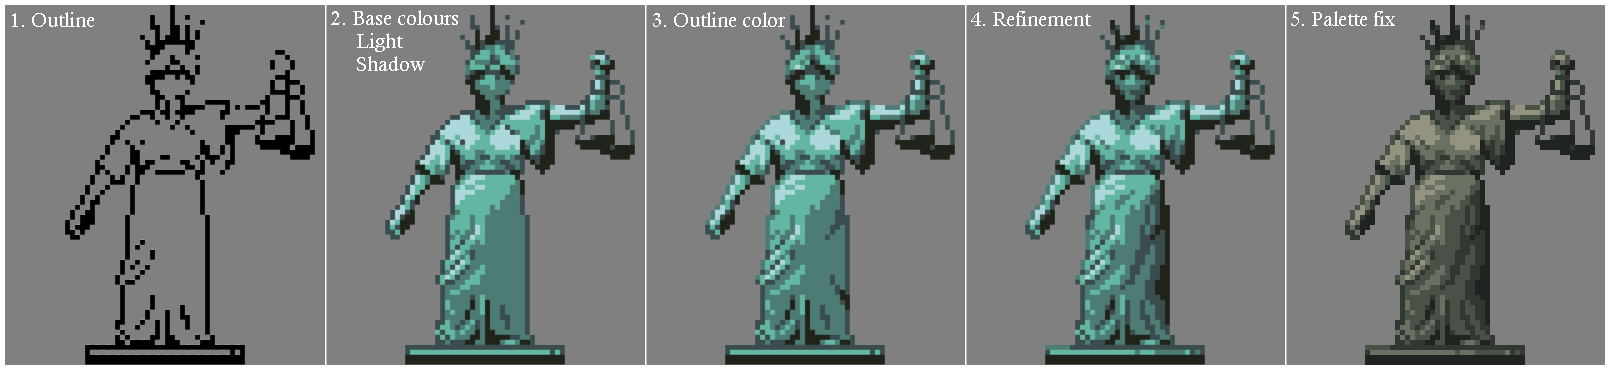
The first method, is one of the most basic. The outline of the sprite is drawn, usually with connected edges so that it can be filled with a bucket tool. Once the "base colours" are filled in, lighting and shading are added by hand. Many artists like to colour the outline too, making it lighter when it is next to lighter tones so that the overall sprite looks more soft and smooth.
The advantage of this approach is that it only requires one software, and none of the work involved with switching/converting mediums. It's also well suited to animation as you can more easily maintain consistency of style, form, and details since you personally drew everything. The downside is that this approach requires the most skill as purely a pixel artist.
Freehand (Silhoette method)
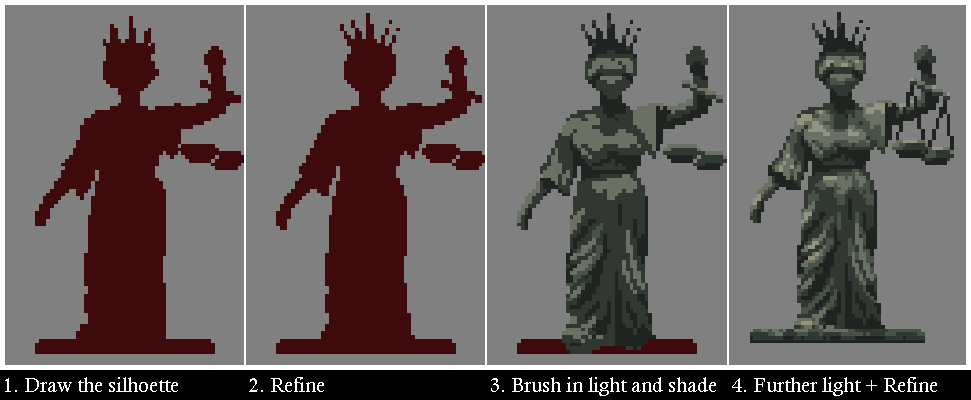
This approach involves painting the sprite with a brush tool, often without any outlines/lineart at all but also often used in conjunction with the method above. The first step is to draw the silhoette, before refining. What I refer to as "refining" is when the artist pays attention to details and edges at the pixel level. This is where they fix "jaggies", dither patterns, and readability. After doing this to the silhoette, the artist then paints in highlights and shadows, before refining the sprite further.
This approach is favoured by a lot of indie game developers because it can be used to achieve a passable quality with minimal attention to individual pixels. Personally, I think in this approach, the better pixel artist's skills shine through in that refinement process. A good advantage of this method is that it is generally going to result in strong, clearly readable silhouettes, but the disadvantage is that refining the brushwork can take a long time.
Photo-based spriting
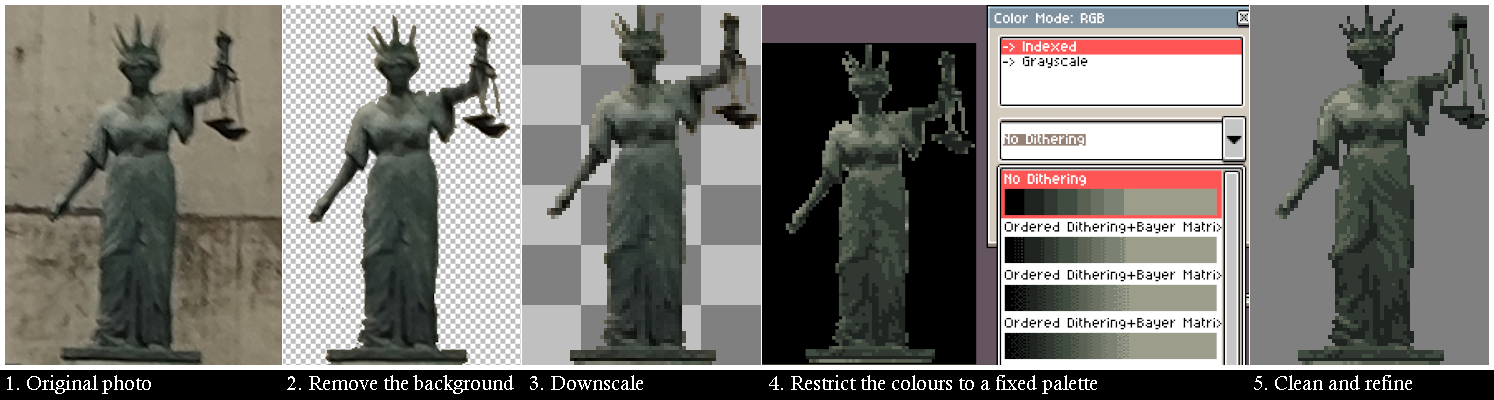
A technique for the hurried artist, or for when you want to maximise realism. A photo of the subject is taken, then the background is erased before downscaling the image to the desired resolution. Erasing the background first means that you can do it more crudely and quickly without having to clean up the outline as much as if you were to remove the background after downscaling. The colours of the image are then restricted to a certain count or a certain palette. Aseprite makes this particularly easy as you can create a new palette from the image, with a fixed number of colours and automatic dithering. Alternatively you can simply use a paint bucket tool with a high tolerance and manually limit the colours. The last step is of course, refinement. In this approach, refinement may involve simply tidying up the outline and fixing jaggies, or it could include reworking details that were lost after downscaling. Sometimes it's better to add in line art or an outline as well.
I think this approach is best suited to texturing or creating backgrounds, since those do not have outlines that will require correcting. It is a useful method since you don't have to spend as much time creating the original image, but if you choose to, there are some interesting applications such as claymation and stop motion.
Drawing in other mediums first
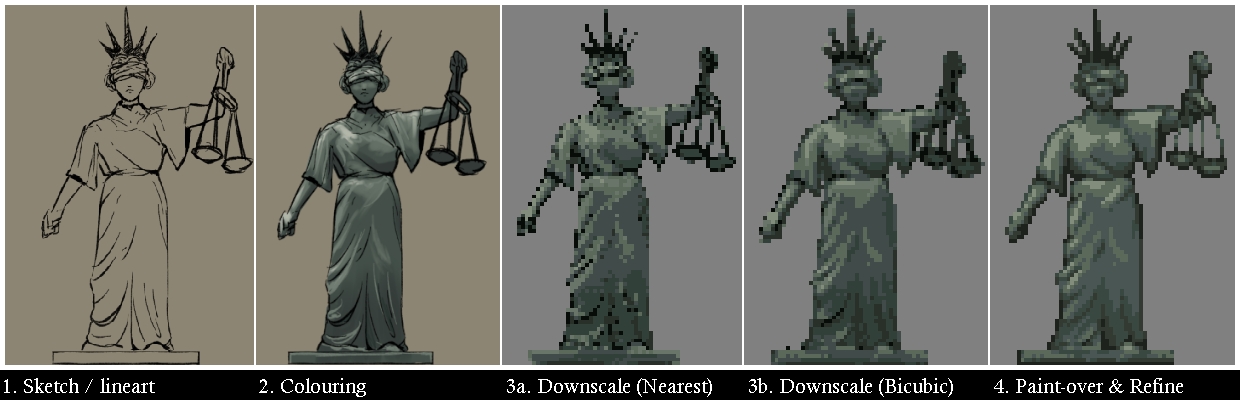
I have already explained this approach in detail in a previous article. In this process, an artwork is drawn using digital or traditional media, and then converted to pixel art. The fastest way to do this is using the same procedure as for photos, but I think greater quality can be achieved by "brushing over" a downscaled copy of the original artwork. The example above shows a digital drawing I converted to a sprite. Digital artworks are helpful for this purpose since you can choose the colours you will use from the beginning and they will not be lost in the process of scanning/photographing your work. On the other hand, traditional media add texture and detail that can help the final sprite look more interesting. It is worth noting that if you do an artwork with thick lines and monochrome shading, there will be less work involved in re-drawing the lines as pixel art, but you will then also have to re-colour the image and it can be harder to read the downscaled details as you only have the values to interpret them from.
The advantage of this approach is that you have probably the greatest control over style. It also allows you to add fine details and textures that are difficult to draw at a low resolution, but remain readable with the right type of downscaling. The disadvantage is that you are, in a way, doubling the amount of work involved. The sprite needs to be drawn twice. If you then animate the sprite, you have to choose between using inconsistent methods (make new frames from the first pixel art sprite) or having to animate your original drawing in addition to the downscaled sprite. That can be helpful for movements that are difficult to depict in pixel art, but for other movements you may find that they become unreadable after downscaling and you will have to animate them using a different approach.
3D-based spriting

This was very popular in old PC games and low end consoles competing with more powerful 3d consoles. In this approach, you create a 3d model that can be rendered as an image, downscaled, and then refined. Since so much detail is lost in the downscaling process, you can afford to use extremely crude modelling and texture mapping. For the example, I simply projected one of the other sprites onto a block-out, and filled any gaps in the texture map with a tiling stone texture. For creating render from a single perspective, this worked fine, but with more care and effort this method is excellent for creating sprites for different perspectives and angles. It is almost the opposite of drawing high resolution artworks first - instead of needing more assets, you now only need to create one and convert that same asset multiple times to get multiple sprites or animation frames. 3D gives you access to bone based animation too, with correct perspective and depth.
This method is excellent for complicated shapes and perspectives, or maintaining consistency when depicting the same object in multiple sprites. You can use this approach to save time and effort on colouring/lighting, and it can even be used for cool effects like reflections and semi-transparent materials. Of course it is not without disadvantages - it can be hard to escape the distinctive look of 3d rendered images, and without aggressive palette limitations, there can be a lot of work required to refine the image.
Image/Photo editors

Last of all, you can use photo/image editors to get a base image to use with pixel art, or to transform existing pixel art. This is extremely useful when you want to use effects like motion blur, glow, or just generating noise and distortion. It is best suited to texturing, since natural textures have an element of randomness to them that can be hard to achieve by hand. A disadvantage is that it can be hard not to lose details when downscaling, and some software does not have tools to ensure textures tile properly.
These six approaches are all useful in their own way. I think no matter which you prefer, it is worth knowing about them, and what advantages and disadvantages they have. I personally like to draw or paint sprites in other mediums and then convert them, but at some point or other I have used each of them. Of course, there are no rules in art, so use the approach or combination of approaches work for you. Maybe you have another completely different way to do pixel art?